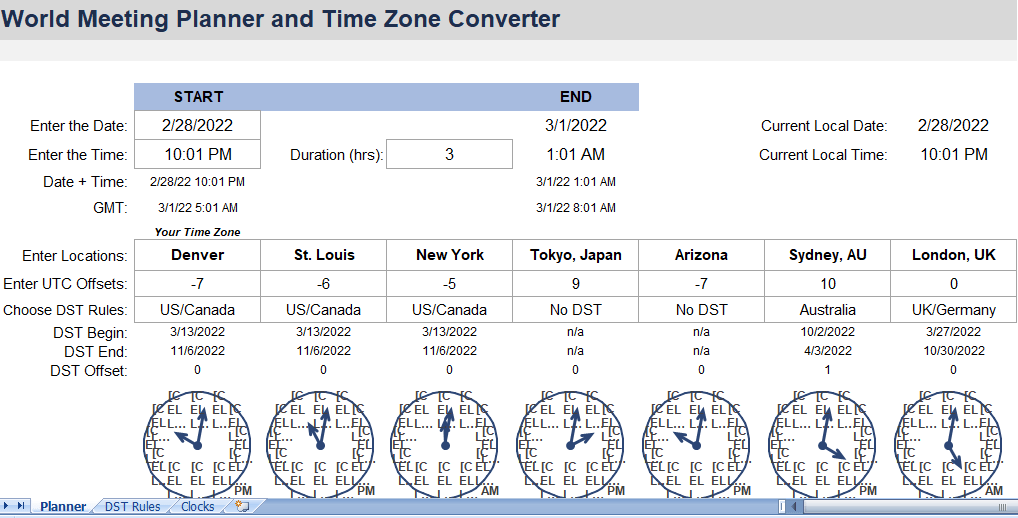
This meeting planner spreadsheet is set up to help you plan conference calls and meetings with people in different time zones throughout the world. Thus, it is also a spreadsheet for meeting planner time zones wise. There are plenty of online time zone converter tools, but why not use Excel, right? Especially if you routinely deal with specific time zones. This world meeting planner spreadsheet lets you list up to 7 locations (including your own). You then enter their UTC Offsets and choose the appropriate DST Rule for each one. After you have that set up, you can enter your meeting time and check the Time Comparison Table to see whether it will work.
How to Use the World Meeting Planner
1. Enter the Meeting Date and Time
Important: The first column in the list of locations should be YOUR location. The Start date and time that you enter for the meeting should correspond to this first location.
You don’t enter the end time for the meeting. Instead, the end time is calculated after you enter the Duration (in hours).
To Display the Current Date and Time Enter the formula =TODAY() in the start date field and =NOW()-TODAY() in the start time field. Then, every time the spreadsheet recalculates, such as after press F9, the dates and clocks will update to show the current time. Pretty awesome!
2. Enter Labels for the Locations
The labels are just labels, so it doesn’t matter what you call each location. You could enter a person’s name if you wanted to.
3. Enter the Standard UTC Offset
The “Standard” UTC Offset is the offset for the location in mid-winter. In other words, “Standard” time refers to when the location is NOT on Daylight Saving Time.
4. Choose a Daylight Saving Time Rule
The complexity of time zone conversion comes from Daylight Saving Time (DST) rules, which are different throughout the world. There are even different rules for locations within a main time zone, such as Arizona.
Each rule defines the dates that DST begins and ends, and if a location is ON DST, then it is assumed that 1 hour is added to the UTC offset. There may be exceptions to that in reality, but they are rare, so I stuck with this assumption for now.
I intentionally tried to keep the spreadsheet as simple as possible, so I didn’t account for the time that DST starts (typically 2:00 am), and the rules only work for a single year (which is why I have a note about the planner not working for meetings spanning multiple years).
The DST rules do not have standard names, so you will need to identify the rule for your locations by looking up information on Wikipedia and choosing the correct rule based on the information and tables in the DST Rules worksheet. I named the rules using some common locations, but you can change the names if you want to.
Using the Time Comparison Table
The table at the bottom of the worksheet helps you see the availability times for people in different locations. You can enter their normal work hours above the table. The cells shaded red are the times that they are NOT available. The lighter shade of red shows when they “might” be available and these areas are currently set as 1 hour before work and 4 hours after work (you can change that).
The Time Comparison Table is rounded to the nearest hour, so even though it highlights your meeting time, note that the shaded time is rounded to the hour.
Why the Analog Clocks?
I included analog clocks mainly because I figured out a way to make the clocks with Excel charts and thought it would be fun to create something like a “World Clock” with Excel. But I think that the Time Comparison Table is more useful for planning meetings.
If you are curious about how to create clocks like this with Excel, see the Clocks worksheet. The clocks use an XY chart with the center of the clock at (0,0). All the elements of the clocks are created using different series and labels and line styles.
Adding More Locations
If you want to add more locations, you’ll probably want to remove the clocks because while it is easy to copy and insert a new column, it isn’t easy to create a new clock.

