
1. Step to Insert a Checkbox in Excel
Here you have two different methods to insert a checkbox. You can use any of this method which you think is convenient for you.
#1 Manual Method
Follow these simple steps.
First of all, go to developer tab and if you are unable to see developer tab in your ribbon, you can use these simple steps to enable it.
In Developer Tab, go to Controls → Form Controls → Select Checkbox.
After selecting the check box click on the place on your worksheet where you want to insert it.
#2 VBA Code
This is another method to insert a checkbox, you can use following VBA code.
ActiveSheet.CheckBoxes.Add(left, Right, Height, Width).Select
ActiveSheet.CheckBoxes.Add(80, 40, 72, 72).Select
Using above method is only helpful when you exactly know about the place to insert and size of the checkbox. Learn more about this method from here.
2. Link a Checkbox with a Cell
Once you insert a checkbox in your worksheet the next thing you need to do is to link it with a cell.
Follow these simple steps.
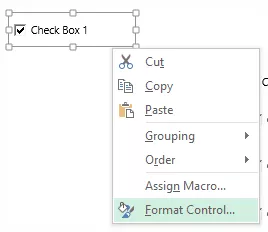
- Right click on the check box and select format control.
- Now, you’ll get a format control dialog box.
- Go to control tab and in cell link input bar enter cell address of the cell which you want to link with the checkbox.
- Click OK.
- In the cell which you have linked with your checkbox, you’ll get TRUE when you tick the checkbox and FALSE when you un-tick.
3. Deleting a Checkbox
You can delete a checkbox by using two ways.
The first way is to select a checkbox and press delete. This is a simple and fast method to do that.

And if you have more than one checkbox in your worksheet. Select all the checkboxes by holding control key and press delete to delete them all.
The second way is to use selection pane to delete them
- Go to Home Tab → Editing → Find & Select → Selection Pane.
- In selection pane, you will get the list of all the checkboxes you have used in your worksheet.
- You can select each of them one by one or you can select more than one by using control key.
- Once you select them, press delete.
4.Printing a Checkbox
Most of the times users avoid printing a checkbox. But if you want to do that you can enable this option by using the following way.
- Right-click on the checkbox, select Format Control.
- Go to Properties Tab.
- Tick mark “Print Object”.
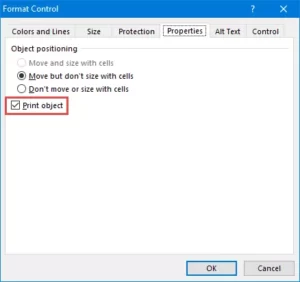
This will allow you to print check boxes, and if you don’t want to print them make sure to un tick this option.
5.Resizinga Checkbox
If you want to resize checkbox you can simply expand its size by using dots from its border.
And, if you want to resize it using a particular height and& width, you can do it by using following steps.
- Right-click on the checkbox and select format control option.
- Go to Size -> Tab Size and Rotate.
- Enter the height and width which you want to fix for the checkbox.
- Click OK.
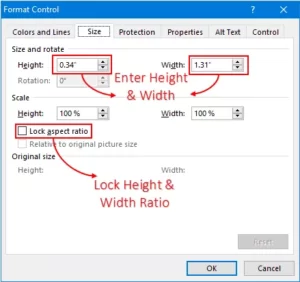
Quick Tip: To lock the aspect ratio for the size of the checkbox tick mark “Lock aspect ratio”.
6. Copy a Checkbox in Multiple Cells
You can use three different ways to copy a checkbox from one place to another.
First: Simple Copy Paste Method
- Select a checkbox.
- Right-click on it and copy.
- Go to the cell where you want to paste that checkbox.
- Right-click and paste.
Second: Use Control Key.
- Select a checkbox.
- Press control key.
- Now with your mouse, drag that checkbox to the another place where you want to paste it.
Third: Using Fill Handle
- Select the cell on which you have your checkbox.
- Use fill handle and drag it up to the cell on which you want to copy checkbox.

7.Renaming a Checkbox
While renaming a checkbox, there is one thing you have to keep in mind that you have two different names which associated with a checkbox.
Caption name and an actual name of a checkbox.
Question: How to change caption name of a checkbox?
Answer: Right-click and select edit text and then delete the default text and enter new text.

Question: How to rename a checkbox?
Answer: Right-click on the check box. Go to address bar and edit the name. Change to the name you want and press enter.
8.Fixing the Position of a Checkbox
One thing you have to take care about when you are working with checkboxes.
That’s ==> Fixing its position.
By default when you insert a checkbox in excel it will change its position & shape when you expand the cell on which it is placed.
But you can easily fix its position using these steps.
- Right, click on the checkbox, go to Format Control → Properties Tab.
- In object positioning, select “don’t move or size with cell”.
- Once you select this option, the checkbox will not move from its position by expanding column or row.
9.Hide or Un-hide a Checkbox
You can also hide or un-hide a check box from your worksheet using these steps.
- Open selection pane by using the shortcut key Alt + F10.
- On the right side of the name of every checkbox, there is a small icon of an eye.
- Click on that icon to hide a checkbox and same icon again to unhide it.
- If you want to hide/unhide all the check boxes you can use hide all button and show all button to show all the check boxes.